Snow Safety

Wear a Helmet - Dura Deck
Snow Safety

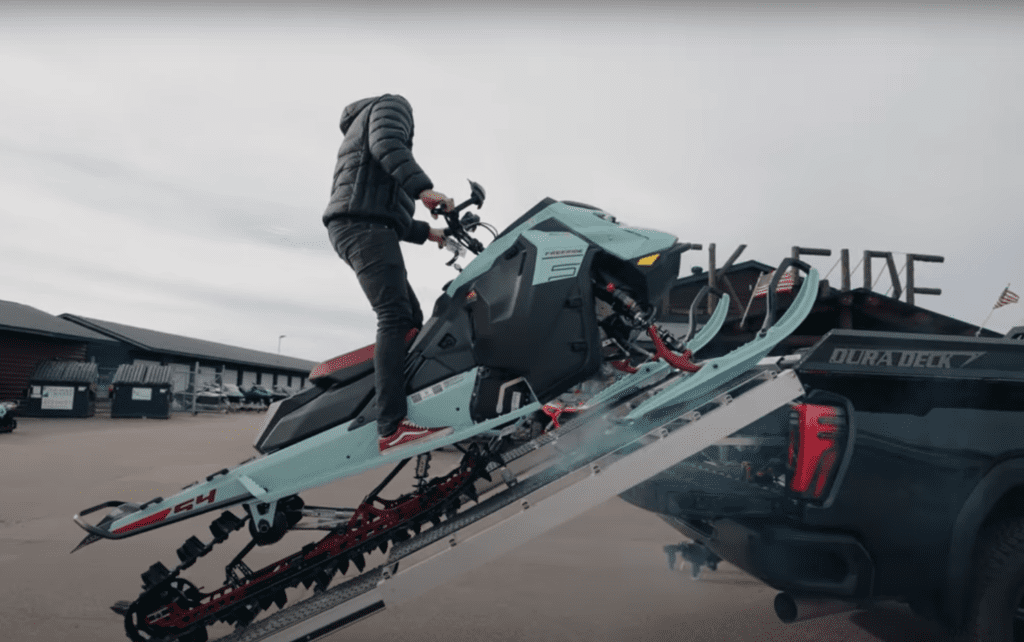
Wear a Helmet When Loading Your Dura Deck Sled Deck

You should wear a helmet when you are loading your Dura Deck sled deck. Loading is one of the highest-risk moments in the process. You’re dealing with a ramp, angle changes, throttle input, and often uneven ground. A small mistake can cause the machine to tip or lurch unexpectedly. If you fall backward off a ramp or get thrown off balance, a helmet protects your head. The helmet keeps you safe from serious impact against the ramp, truck bed, or frozen ground. Loading also involves close proximity to hard surfaces and metal edges, which increases the risk of head injury even at low speeds. Many accidents happen not during aggressive riding, but during simple tasks like loading and unloading. If you wear a helmet, it keeps you protected from sudden throttle response, mechanical slips, or unexpected traction loss. It’s a simple precaution that adds a major layer of safety, protecting you from concussions or worse while safeguarding your ability to ride another day.

Simple Steps to Unload a Sled Deck
Snow Safety

8 Simple Steps to Unload a Dura Deck

In 8 simple steps you can safely unload your Dura Deck sled deck. 1. Have an experienced adult operate the deck 2. Park the truck correctly A tilted surface can cause the machine to come off too fast. 3. Check the Dura Deck components Before anything is moved, an adult should inspect: Anything damaged or sticky should be fixed before unloading. 4. Clear a wide, safe unloading path Behind the truck: Sleds and bikes come off quickly if something slips. 5. Wear protective gear The person riding the machine off the deck should have: 6. Communicate with your helper For safety, unloading your Dura Deck usually uses two people: 7. Use slow, controlled actions Whether sliding the deck out, lowering ramps, or backing the machine down: 8. After unloading

Snow Safety

Transceiver Checks with Caleb Kesterke

Caleb Kesterke does a transceiver check EVERY time he goes out and rides. A transceiver check includes the following: • Find a place away from conflicting transmitting devices. Stand in a half-circle, an arm’s length or more apart. The transceiver check-leader should be a few meters away in the middle of the group.• Turn transceivers on. As they power on, each individual checks that the transceiver runs a self-check and the display is ok. Note battery strength and report it aloud to the group.• Switch all transceivers to Search mode. Silence indicates that everyone is ready and ensures that no transmitting units are on dogs, sleds, or in packs.• The check-leader then switches to Transmit/Send. They check that each group member can receive a signal by walking toward each group member one by one. The group member reads their display out loud.• Turn all units to Transmit. The check-leader witnesses that each group member stows their unit for the day, secured under an outside layer, and 30 cm from cell phone or radio.• The check-leader returns to Search mode and confirms all group members are transmitting. The check-leader then switches to Transmit mode and confirms to at least one group member. They also verify that the check-leader’s device is stored under an outside later and 30cm from a cell phone or radio for the day.

Avalanche Gear to Carry
Snow Safety

What Avalanche Gear Should I Carry?

You need to carry the proper avalanche gear each time you go into the backcountry today. It is vital that you have the correct education and avalanche equipment to make it back to the truck. Before you ride, be sure you have the following on your person:1. Avalanche transceiver2. Avalanche probe3. Avalanche shovel4. Satellite device5. Avalanche airbag (optional)

Avalanche Rescue Transceiver
Snow Safety

How should you respond if caught in an avalanche?

An avalanche is a scary thing! But they are showing to be a greater concern when heading into the backcountry. Therefore, it is important for backcountry users to become familiar with them. It is also important to know how to carry out an avalanche rescue. One of the most important aspects of emergency rescue scenarios is taking care of your own safety first. You are no good to the rescue effort if you are also a victim. Prepare for the worst and know what to do if you are the victim in an avalanche. If you notice the slope beginning to slide, get to safety if possible and then look for the rest of your party. If you feel yourself getting caught: • Yell! Call out for attention.• Your backcountry partners should always have eyes on the person exposed to the avalanche hazard. If your team can establish a last point seen, it will improve your chances of being found quickly.• Deploy your airbag.• Don’t hesitate to do this. The airbag will not affect your ability to yell or exit to the side of the avalanche.• Try to exit to the side of the avalanche.• Slide or roll towards the sides of the avalanche. Snow moves more slowly at the edges of the avalanche. You increase your chances of not being carried as far.• Try to arrest as you’re caught.• If you fail to escape to the side of an avalanche, grab bushes or trees, or arrest yourself in the bed surface in an effort to slow yourself down. This might allow the moving snow to flow around you and leave you high on the slope.

Riding Terrain Selection
Snow Safety

Selecting Riding Terrain

Terrain selection for your backcountry travel is vital. Not only does it help with your safety throughout your ride, but it also helps indicate whether you might make it back to the truck or not at the end of the day. Here are three keys for selecting your riding terrain: Selecting the right terrain for snowmobiling is crucial for safety, enjoyment, and optimal performance. Here’s a step-by-step guide for choosing the best snowmobile riding terrain: 1. Assess the Skill Level of Your Riding Group 2. Consider the Current Snow Conditions 3. Evaluate the Terrain’s Topography

Avalanche Safety is Vital
Snow Safety

Avalanche Safety is Vital

Avalanche safety is vital when going into the mountains! When you head into the backcountry on a snowmobile, it is vital that you have the correct education and avalanche equipment to make it back to the truck. Before you ride, be sure you have the following on your person:1. Avalanche transceiver2. Avalanche probe3. Avalanche shovel4. Satellite device5. Avalanche airbag (optional) Dura Deck takes pride in being prepared for the backcountry and the safety of all riders.

Shopping Cart
Scroll to Top